

How to Deploy a VueJs Website to Production: The Right Wa
We want to set up the infrastructure for Chakula, our goal is simple: we want the deployment to be boring. Push code to `main`, wait two minutes, done. But we also want genuine security — not the "we added HTTPS" kind, but layered protection against SQL injection, XSS, path traversal, and the long tail of attacks that hit public-facing web apps every day.
This article walks through exactly how we deploy our Nuxt 3 landing page using Caddy as the reverse proxy and Coraza WAF (Web Application Firewall) as the security layer. Everything runs in Docker, orchestrated by a single `docker-compose.yml`, and deployments are fully automated through GitHub Actions.
By the end you will understand:
- How the Nuxt app is containerised with a multi-stage Docker build
- How Caddy handles TLS, HTTP/3, and reverse proxying
- How Coraza WAF intercepts and inspects every request against the OWASP Core Rule Set
- How all of it is wired together in one compose stack
- How CI/CD takes a `git push` all the way to a live deployment
The Architecture at a Glance
Before diving into files, here is the bird's-eye view of what runs in production:
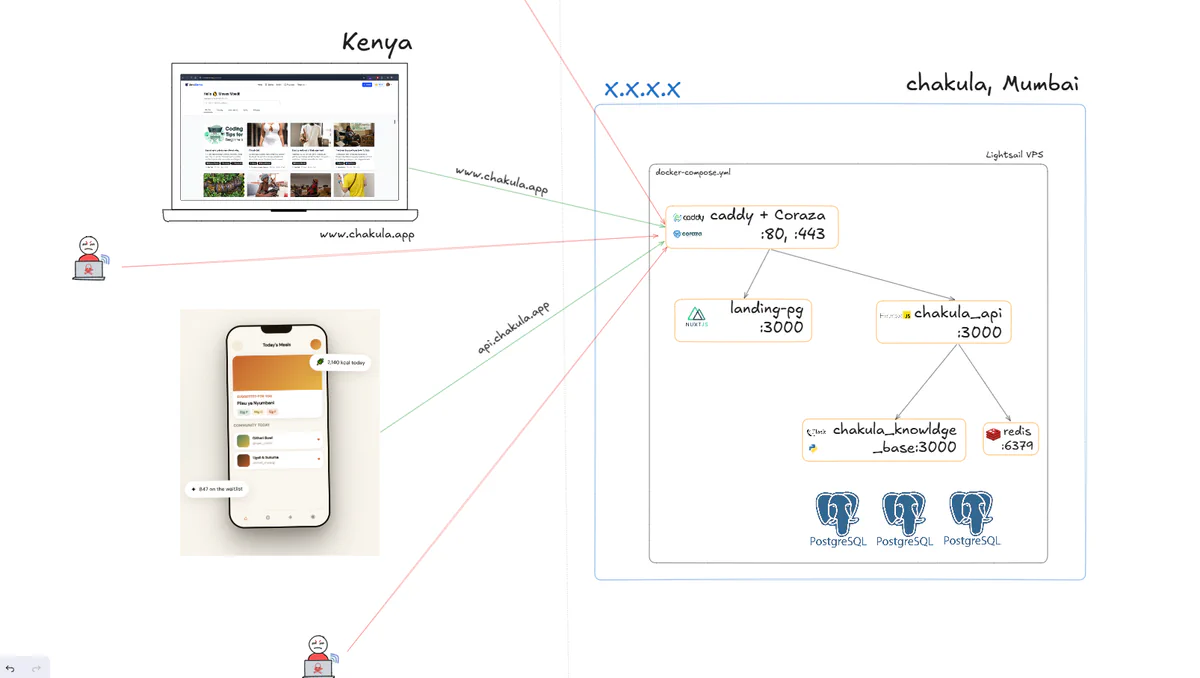
The Nuxt frontend and all backend services (knowldge base, api, redis) live inside a private Docker bridge network called `chakula_net`. Only Caddy is exposed to the internet. Nothing else can be reached directly — no database ports, no API ports, no internal services. Every single request passes through Caddy and its WAF first.
Part 1 — Containerising the Nuxt App
The Multi-Stage Dockerfile
The Chakula landing page is a Nuxt 3 SSR application. We containerise it with a three-stage Docker build that keeps the final image as small as possible:
```dockerfile
# ── Stage 1: Install dependencies ────────────────────────────────────────────
FROM node:20-alpine AS deps
WORKDIR /app
COPY package.json package-lock.json* yarn.lock* pnpm-lock.yaml* ./
RUN \
  if [ -f yarn.lock ]; then yarn install --frozen-lockfile; \
  elif [ -f pnpm-lock.yaml ]; then npm install -g pnpm && pnpm install --frozen-lockfile; \
  elif [ -f package-lock.json ]; then npm ci; \
  else npm install; \
  fi
# ── Stage 2: Build ────────────────────────────────────────────────────────────
FROM node:20-alpine AS builder
WORKDIR /app
COPY --from=deps /app/node_modules ./node_modules
COPY . .
ENV NODE_ENV=production
RUN npm run build
# ── Stage 3: Production runner ────────────────────────────────────────────────
FROM node:20-alpine AS runner
WORKDIR /app
ENV NODE_ENV=production
ENV PORT=3000
ENV HOST=0.0.0.0
ENV NITRO_PRESET=node-server
COPY --from=builder /app/.output ./.output
EXPOSE 3000
HEALTHCHECK --interval=30s --timeout=5s --start-period=10s --retries=3 \
  CMD wget -qO- http://localhost:3000/ || exit 1
CMD ["node", ".output/server/index.mjs"]
```
Why three stages?
Each stage serves a distinct purpose:
-
deps installs all dependencies including `devDependencies`. This is the heavy stage. By isolating it, Docker caches it separately — if only your source code changes, this layer is reused.
-
builder copies the installed `node_modules` and runs `nuxt build`. Nuxt's Nitro engine compiles everything into `.output/`, a self-contained folder with the server, public assets, and nothing else.
-
runner is the production image. It only receives `.output/` from the builder. There are no source files, no `node_modules`, no devtools. The final image is dramatically smaller than if you had just run `npm install && npm run build` in a single layer.
The `NITRO_PRESET=node-server` environment variable tells Nitro's output format to generate a plain Node.js HTTP server (`index.mjs`) rather than targeting a specific cloud platform. This is what makes the app portable across any Docker host.
The health check pings the root route every 30 seconds. Docker Compose (and Caddy's health awareness) will restart the container if it fails three consecutive checks.
Part 2 — The Deployment Repository
The chakula-landing repository only holds application code. Infrastructure lives in a separate repository: `chakula_deployment`. This separation means infrastructure changes can be reviewed, rolled back, and versioned independently of application code — a pattern that pays off quickly at any scale.
The deployment repository contains four critical files:
chakula_deployment/
├── Dockerfile.caddy        ← builds Caddy with WAF plugin
├── Caddyfile               ← reverse proxy + WAF configuration
├── docker-compose.yml      ← orchestrates all services
├── .env                    ← secrets (never committed)
├── .env.sample             ← template committed to the repo
└── .github/
    └── workflows/
        └── deploy.yml      ← SSH-based auto-deployment
Let's walk through each one.
Part 3 — Building Caddy with Coraza WAF
Caddy is a modern web server written in Go. Its killer feature is automatic HTTPS: point a domain at your server, and Caddy fetches a Let's Encrypt certificate, configures TLS, and handles renewals — all without a single command.
But Caddy's default build does not include a WAF. WAF support comes from **Coraza**, an open-source OWASP-compliant WAF engine. To use it, we compile Caddy from source with the Coraza plugin included. That is exactly what `Dockerfile.caddy` does:
```dockerfile
# Stage 1 — compile Caddy with the Coraza WAF plugin
FROM caddy:builder AS builder
RUN xcaddy build \
    --with github.com/corazawaf/coraza-caddy/v2
# Stage 2 — copy the compiled binary into a clean image
FROM caddy:latest
COPY --from=builder /usr/bin/caddy /usr/bin/caddy
```**`xcaddy`** is Caddy's official build tool. It works like `go build` but understands Caddy's plugin system. When you pass `--with github.com/corazawaf/coraza-caddy/v2`, xcaddy fetches the Coraza module, links it into the Caddy binary, and produces a single executable that contains both Caddy and the WAF engine.
The two-stage pattern keeps the final image clean: the builder stage has all the Go toolchain, compiler, and source code, but only the finished binary is copied into the lightweight `caddy:latest` image.
The build takes two to three minutes the first time. Subsequent builds use Docker's layer cache unless the Coraza version changes.
---
## Part 4 — Configuring Caddy and the WAF (The Caddyfile)
This is the heart of the security setup. The Caddyfile configures everything Caddy does — routing, TLS, WAF rules, security headers, and logging.
Here is the complete Caddyfile, which handles the API. The frontend block follows the same pattern:
```caddyfile
{
    # WAF must run before any other handler — this declares the execution order
    order coraza_waf first
}
chakula-api.somastories.app {
    # ── Coraza WAF (OWASP Core Rule Set) ──────────────────────────────────────
    coraza_waf {
        load_owasp_crs
        directives `
            Include @coraza.conf-recommended
            Include @crs-setup.conf.example
            Include @owasp_crs/*.conf
            SecRuleEngine On
            SecRequestBodyAccess On
            SecResponseBodyAccess Off
            SecAuditEngine RelevantOnly
            SecAuditLog /var/log/caddy/coraza-audit.log
        `
    }
    # ── Reverse proxy to the internal service ─────────────────────────────────
    reverse_proxy chakula_api:3000 {
        header_up Host {host}
        header_up X-Real-IP {remote_host}
        header_up X-Forwarded-For {remote_host}
        header_up X-Forwarded-Proto {scheme}
    }
    # ── HTTP security response headers ────────────────────────────────────────
    header {
        Strict-Transport-Security "max-age=31536000; includeSubDomains; preload"
        X-Content-Type-Options "nosniff"
        X-Frame-Options "DENY"
        X-XSS-Protection "1; mode=block"
        Referrer-Policy "strict-origin-when-cross-origin"
        -Server
    }
    # ── Access logging ────────────────────────────────────────────────────────
    log {
        output file /var/log/caddy/chakula_api.log
        format json
    }
}
```
To add the **frontend**, append a second block to the same file:
```caddyfile
chakula.app {
    coraza_waf {
        load_owasp_crs
        directives `
            Include @coraza.conf-recommended
            Include @crs-setup.conf.example
            Include @owasp_crs/*.conf
            SecRuleEngine On
            SecRequestBodyAccess On
            SecResponseBodyAccess Off
            SecAuditEngine RelevantOnly
            SecAuditLog /var/log/caddy/coraza-audit.log
        `
    }
    reverse_proxy chakula_landing:3000 {
        header_up Host {host}
        header_up X-Real-IP {remote_host}
        header_up X-Forwarded-For {remote_host}
        header_up X-Forwarded-Proto {scheme}
    }
    header {
        Strict-Transport-Security "max-age=31536000; includeSubDomains; preload"
        X-Content-Type-Options "nosniff"
        X-Frame-Options "SAMEORIGIN"
        Referrer-Policy "strict-origin-when-cross-origin"
        -Server
    }
    log {
        output file /var/log/caddy/chakula_landing.log
        format json
    }
}
```
>
**Note:** The frontend uses `X-Frame-Options: SAMEORIGIN` instead of `DENY` because Nuxt renders pages that may include embedded iframes for its own routes. Adjust to `DENY` if you have no such requirement.
### Breaking Down the WAF Configuration
Let's go line by line through the WAF block, because this is where the real security work happens.
#### `order coraza_waf first`
This goes in the global Caddy configuration block `{ }`. Caddy processes handlers in a defined order. By declaring `order coraza_waf first`, we ensure the WAF runs *before* the reverse proxy, *before* static file serving, *before* anything else. A request that the WAF blocks never reaches your application. If this directive were missing, a sophisticated attacker could potentially craft a request that slips past the WAF by exploiting the order in which handlers evaluate the request.
#### `load_owasp_crs`
This single directive loads...
Loading comments...
Related Stories
Explore More Topics
No topics available at the moment